Red Velvet Pancakes For Valentine’s Day

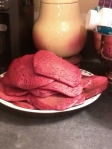
valentines day babiesTo all of my Valentines, I hope you have a wonderful Valentine’s Day! I made these pancakes this weekend in preparation for breakfast on Thursday with my Valentines (since I will be working both jobs that day and won’t be seeing them other than at breakfast before bedtime really). These hold up great frozen in proportioned Ziploc baggies (where is my endorsement deal from them?) for about a month, so this recipe makes tons of pancakes. Enjoy the love-fest all month long!

Red Velvet Pancakes

Red Velvet Pancakes

6 cups all-purpose flour

6 teaspoons baking powder

1 1/2 teaspoons baking soda

1 1/2 teaspoons salt

1 1/2 cups white sugar

1 cup unsweetened cocoa powder

6 eggs

4 1/2 cups buttermilk

1 1/2 cups 2% or whole milk, or almond milk, or half and half (no 1 % or skim)

6 tablespoons red food coloring

6 teaspoons vanilla extract

1 ¼ cups unsalted butter, melted

Mix all the dry ingredients in a really large bowl. Mix all the wet in a medium-sized bowl, whisk these

Because I love these old cards...

Because I love these old cards…

thoroughly, this is like when making a cake, once you combine wet and dry ingredients you are going to want to leave lumps so that these pancakes are nice and fluffy.Combine everything in the large bowl, slowly whisking until it’s well combined. (There should be no flour in the bottom of the bowl, but small lumps of flour in the mix are good)

Heat very flat frying pan, or griddle, to a medium high heat. (If your first batch of pancakes turns too dark or cooks super-fast, lower the heat. They should take a while to cook.)

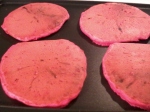
Pour out batter onto griddle and leave them alone as the bubbles form. When the uncooked side is fairly covered in popped bubbles, flip. (The edges will also look dry)

After flipping, allow them to rise (DO NOT press them down! This will make them heavy instead of fluffy!). The reason you are cooking at the lowest possible temperature is so they can cook through without burning or squishing, all of which are bad for pancakes. The best time for this side is about ½ the time they spent on the other side cooking. Experiment with the timing until you get a feel for it.

*This is also fun if  you toss in chocolate chips instead of cocoa powder and  reduce sugar to 1/2 cup, and reduce red food coloring to about 3 Tablespoons. Then you have Pink Chocolate Chip Pancakes!*

Sizzling on a griddle...

Sizzling on a griddle…

You can use regular syrup (BoyChild II is a purest). I also (thoroughly) enjoy melted butter with a sprinkle of powdered sugar as my topping. (Of course, I like any pancake best this way, you know, dripping with buttery goodness…) But if this is all too pedestrian for you (or there is someone to impress) try the following glaze recipe poured hot over the top.Vintage VDay

Cream Cheese Glaze:

Remember Cream Cheese Frosting? Get 2 cups out of your fridge (What you haven’t been keeping some in there for mid night snacking straight from the Tupperware “just in case”?! Well, then whip some up real quick).

Put the 2 cups frosting in a microwave safe bowl, add 2 Tablespoons of water.

Heat on 50% power 30 seconds at a time, stirring every 30 seconds, until melted. If your mix is still too thick, add more water 1 Tablespoon at a time.

Space VDayServe glaze warm over hot, buttered pancakes.

Do you have a special Valentine’s Day meal? Please share in the comments or email me at mamaskitchentable@gmail.com.

eggcellent valentine

eggcellent valentine

Happy Valentine’s Day my loves!

Jazzing up Thanksgiving Leftovers

Who’s over their Thanksgiving leftovers? Tired of plates of Turkey, stuffing, greens and cranberry sauce? It’s cool, me too, and for the record there has never been a “part 6” of a series that wasn’t tired and at least a little disappointing. The following recipes are versions of Shepard’s Pie that are designed to use my Thanksgiving leftovers. I recommend not doing all of these, pick the leftovers you have the most of for this one and then do something completely different tomorrow night. Also? All of these can be frozen after assembled for about 3 to 4 months, so you can save these for February when you really like turkey again if you’d rather.

Option 1:

  1. Tear or dice cooked turkey (white or dark won’t matter) and place in bottom of medium-sized casserole dish.
  2. Add 1 can drained or 1 small bag frozen mixed veggies (soup mix or diced mix work best) to casserole dish.
  3. Top with enough turkey gravy to coat (about 1 to 2 cups, this is a preference thing) and stir.
  4. Create “top crust” with mashed potatoes. You want this layers to be between 1 1/2 and 3 inches deep, again depending on preference. Also, it’s a crust, do not stir.
  5. Sprinkle paprika and seasoned salt across the top.
  6. Bake in 350 degree oven until peaks of potatoes brown slightly, this will take about 20 minutes.
  7. Make sure dish is hot all the way through and serve!

Option 2:

  1. Repeat steps 1 through 3 from above.
  2. Top with “top crust” of stuffing (or dressing, whatever you call it). This layer should be about 2 to 3 inches thick. Do not stir.
  3. Sprinkle with paprika across the top.
  4. Bake in 350 degree oven until edges of stuffing become browned and crispy, about 20 minutes.
  5. Make sure dish is hot all the way through and serve!

Option 3:

  1. Repeat steps 1 through 3 from option 1.
  2. Crumble cornbread over top, creating a 2 inch minimum topping. (If you have no cornbread but want to try this: mix 1 box Jiffy Corn Muffin mix as directed on the box and pour over “filling”. Bake as directed on box)
  3. Add several (generous or about 2 Tbls) dollops of butter sporadically over the cornbread. Cover dish with lid.
  4. Bake in 350 degree oven until heated through and butter has melted, about 20 minutes.
  5. Serve and enjoy!

Option 4:

  1. Repeat step 1 from option 1.
  2. Add any leftover veggies (ex: corn off cob, green beans, broccoli, spinach); or few spoonfuls of green bean casserole (now mushy onions and all); or broccoli casserole. whatever you add, stir it all together.
  3. Add about 2 cups (again preference thing here) of shredded cheddar or colby cheese. (If you are using broccoli casserole you should probably go with just one cup).
  4. Top with mashed potatoes, twice-baked potato casserole, or cornbread. (Depending on what you are topping with follow the appropriate instructions above, or just coat top with potato casserole about 2 inches thick).
  5. Bake about 20 minutes in a (you guessed it) 350 degree oven.
  6. Make sure it is heated through and serve!

Option 5: (the veggie-less option for the picky ones in your group)

  1. This works best with leftover ham torn into bits, but turkey and chicken also work. Layer leftover meat in bottom of medium-sized casserole dish.
  2. Add one can (drained) in its own juice chuncked or tidbit pineapple. (if you have leftover crushed or that’s what’s in your pantry, that’s fine, just use about 1/2 of the can (also drained).
  3. Top with leftover sweet potato casserole or any leftover cooked sweet potatoes (including just plain mashed or sliced). Sprinkle crushed pecans on top (if you like).
  4. Heat in microwave until heated through, or oven if you prefer (but put the lid on in the oven).
  5. Serve and enjoy!

So five casseroles to choose from. These use up some leftovers pretty quick (especially if you make one to freeze for later). Obviously all of these are still going to have a fall comfort food feel, so I like to alternate a leftover casserole with something like spaghetti or tacos, just to break things up. I hope these ideas help you jazz up some of your leftovers!

Simply Turkey

Thanksgiving Spread 2011

Cooking a turkey can be very intimidating the first time. I know I was petrified. Then there’s the rumor going around that you have to get up at 5am to cook said turkey, which is just silly, unless you wanted Thanksgiving Breakfast I suppose. So this is the way I’ve discovered to cook a turkey in your oven that is easy, moist and delicious (also the meat seasoned this way work great for a million turkey leftover recipes). First you have to select your turkey. Remember how you figured your head count? Well, imagine about 1lb uncooked bird per person. This will leave you with plenty of leftovers, but not leftovers in December. I cook about a 12 1/2lb turkey even though our head count is 13 or so, mostly because we make way too many sides each year and this year we are also having ham (ironically this is a “guy thing”). The list below gives you cook times so you can better plan your day.

*Keep in mind that if it’s a frozen turkey you should start thawing it (on the bottom shelf of your fridge) Sunday afternoon or Monday morning. *

6-8lbs 2-2 ½ hrs

8-12lbs 2 ½-3 hrs

12-16lbs 3-3 ½ hrs

16-20lbs 3 ½-4 hrs

20-24lbs 4-4 ½ hrs

Turkey is done when it reaches a temperature of 165 degrees internally. They come with those little pop out thingies that will let you know when they are done, but I do like to double check with a meat thermometer, just in case. I cook our turkey at 350 degrees, but as the day goes on I occasionally turn the oven up to say 375 for rolls (which will only be about 10 to 15 minutes, and will not harm your turkey). I assume that’s why my turkey never takes the full amount of time to cook, but I only have the one oven. Also when plotting time for Thanksgiving Day, keep in mind after you cook your turkey it needs 20 to 30 minutes to “rest” (which is fancy chef’s language for let the juices get all good and soaked in) before you carve it. This is the perfect time to stick a few things back in that suddenly empty oven to heat them back up.

My rub for simply wonderful turkey:

Onion Powder

Paprika

Seasoned Salt

Dried Rosemary (crush it in your hand before mixing it with the other seasonings)

Pinch of Sage (compared to others)

Pinch of Black Pepper

The top 4 ingredients   should be in almost equal portions, sorry, I never measure and have no idea how much I put on a turkey. This should be rubbed on the breasts of the turkey under the skin and all over the exterior of the turkey.

I make my rosemary olive oil, but you can but it too and it’s not that expensive. I use that under the breast skin (about 2 Tbls) and then drizzled over the entire bird (about 7 or 8 Tbls). While I am lubing up and rubbing down the turkey (we get very close) I am preheating the oven, you want that turkey to go into the oven no cooler than 350 or you really will be doing this all damn day. While you are cooking and assembling other dishes do not forget your turkey’s most important ingredient! That’d be love and attention. Every time you open the oven door use either a turkey baster or a ladle (I mean big cooking ladle, not teeny gravy ladle) and scoop the juices from the pan back over the turkey. Think of you turkey like a well behaved 5-year-old, you can leave it be, but you should check on it at least every 30 minutes. If your oven door hasn’t opened in the last 30 thirty minutes, do so and ladle that baby up. I was looking for the tiny turkey cooking times and the giant turkey cooking times on the internet when I (happily, because I cook about the way she does and firmly believe butter gets a bad rap) discovered this is also how Paula Deen cooks her turkey! She uses a more sophisticated rub, (duh, real cook) but I’m referring to the turkey basting love, I thought that was kinda cool.

Don’t be scared of the turkey (they are not even intimidating before they get naked the way you buy them at the store), and wow the hell of anybody who gets the privilege to sit at your table this year. (Miscreants are eating out of their laps in the den around here, so really, privilege.)

Pumpkin Soup

This is about the same color as I remember this soup being, I stole this picture because I have never taken a picture of this soup, sorry. I tried this for the first time about two Thanksgivings ago as a way to jazz up some leftover cooked sweet potatoes, but it works just as well with pumpkin. The point is it’s one of those dishes that appears way more fancy than it is. (And a great way to sneak in some veggies for your picky eater)

What You Will Need:

2 Tablespoons butter (or margarine)

1 cup chopped onion

2 celery stalks, chopped

4 carrots, peeled and chopped

1 large garlic clove, chopped

1 large can pumpkin (or what I usually use: 3 sweet potatoes cooked, peeled, cut into large chunks)

1 can (about 16 ounces) low sodium chicken broth (you can use veggie broth if you prefer)

1 can (about 10 ounces) evaporated milk

1 cinnamon stick

1/4 teaspoon ground nutmeg

1 1/2 cups whipping cream (not heavy whipping cream)

2 Tablespoons maple syrup

Large saucepan (with lid)

Blender (unless you are truly gadget gifted and own a food processor, of course my blender lives on the countertop which makes its access easier too, so there’s that…)

What to Do:

In a saucepan cook onion, celery, carrots, garlic, broth, and butter until everything is mushy. (Celery will be clear and you will be able to literally mush the carrots with the spoon you are stirring with against the side of the pan)

Add canned pumpkin (or sweet potatoes) to blender along with cooked veggie mix and evaporated milk. Blend until very smooth, it will be just too thick for a straw. Add nutmeg and maple syrup to blender, blend again.

Dump contents of blender back into saucepan. Turn heat to medium. Drop in Cinnamon stick.

Add whipping cream and stir.

Bring back to boil, then reduce heat to simmer and cover for 20 minutes.

Remove cinnamon stick and serve!

*This is great as a side/meal starter, but it makes a really festive simple lunch served with plain toasted cinnamon raisin bread.*

Braided Wreath Pumpkin Bread

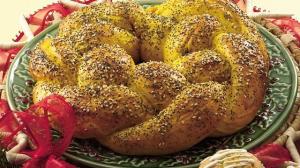
I promise yours acan look like this too, super easy!This is a recipe I got from one of those small paperback cookbooks in the grocery store. Click here for the link to the original recipe (the completed picture is also from their site, as it looks clearer that any picture I had available). The recipe below is my 3rd (or 4th) version of the original. Not much tweaking has actually occurred in our favorite version of this, which is part of the reason I tracked down the website, gotta give those folks at Pillsbury their due, right? This wreath is usually something that gets made at Christmas time and given as a gift or brought to a gathering.

What You Will Need:

Bread:

In between 6 and 6 1/2 cups flour

1/4 cup sugar

¼ cup light brown sugar (packed)

1 1/2 teaspoons salt

2 packages regular active dry yeast

1 cup canned pumpkin

1/4 cup butter (go real, salted butter here, I promise you will notice the difference)

1 1/2 cups apple juice

Fancy Top: (which is really easy & totally looks just like the picture, so give it a go)

1 egg

2 Tablespoons water

2 teaspoons sesame seed

2 teaspoons poppy-seed

What to Do:

In a small sauce pan on medium/high heat combine pumpkin, butter and juice. You will want the butter melted and the mixture to start to bubble, then immediately remove from heat.

Combine dry bread ingredients in a large mixing bowl. (Use only 2 ½ cups of flour at this time)

Add hot pumpkin mix to flour; mix with electric mixer until just combined. Start to gradually add more flour until you have a soft dough. (You probably will not need all the flour listed)

Dust flour on (clean) countertop and place dough on top; knead to mix ingredients really well. (spend 2 to 4 minutes doing this, but keep in mind over kneading is just as bad as over mixing and how you end up with doorstops instead of fluffy breads).

Butter (again as a verb) a medium-sized mixing bowl and roll dough inside to grease it all over. Cover dough in bowl with Saran Wrap. Leave the dough on the counter for at least 1 hour. (It should grow about 2 time its previous size)

While you are waiting, butter a large round cake pan.

When the dough is huge punch it down and then divide it into 2 halves, then each half into 3 equal (or as best as you can) parts.

Now the fun part! This is Play-doh you can lick later and not regret. Roll each sixth into a dough rope (try to keep them all the same length). Using 3 ropes at a time pinch the ends together and braid. Add other ropes, pinch into a circle when you get to the end.

Place in cake pan. Cover with (clean) dish towel and put back on counter for about 30 minutes. (That yeast’ll go crazy and double again, which can be very entertaining for any tiny cooks in your kitchen, they can also really help with this next part)

Preheat oven to 375 degrees.

While your wreath is rising whisk egg and water in a small bowl.

Once wreath is ready to bake use a pastry brush to brush on egg mixture (it’s called an egg wash) if they can “paint” gently let those tiny cooks do this. Lightly sprinkle seeds on top.

Put in oven and bake about 25 minutes (it will be a lovely golden brown when done).

Remove from pan and allow to cool.

*Note: this is great room temperature or warm, but warm and dipped in apple butter? That is something that you think about later if you know what I mean…*