Chicken Taco Casserole

A quick hello from us at the Table! Missed you guys! I have been going through a lot of changes around here the last couple of months and am REALLY looking forward to everything settling down in the next couple of weeks! (more on that to come) I hope you are all enjoying your summer , and I am looking forward to sharing all our exciting new stuff! Until then, another easy meal for you guys to try. As always, let me know if you try it and what you thought!

Super Happy Cactus DudeYou will need:

½ lb boneless, skinless chicken breast

1 packet taco seasoning

Water

1 can corn, drained

1 can black beans, drained and rinsed

Shredded cheddar, about 8oz

Salsa (chunky works best), about 1 ½ cups

1 package corn muffin mix (and any ingredients listed on it) for this recipe I used 1 box Jiffy mix.

Medium sized casserole dish with lid

What you should do:

Cook chicken all the way through.

Add ¾ cup water and 1 packet of taco seasoning to chicken. While the seasoning is thickening, break up the chicken into small pieces using a wooden spoon.

Heat oven to 400 degrees.

Mix cornbread mix in a small bowl, set aside.

In Medium sized casserole dish, layer chicken in sauce across the bottom.

The next layer will be the black beans, then corn.

Layer cheese, then salsa.

Pour cornbread over the top, smooth with spatula.

Bake until cornbread is done all the way through. This will take about 35 minutes.

*Tip: if the cornbread starts to brown too much, put the lid from the casserole dish on top.*

Red Velvet Pancakes For Valentine’s Day

valentines day babiesTo all of my Valentines, I hope you have a wonderful Valentine’s Day! I made these pancakes this weekend in preparation for breakfast on Thursday with my Valentines (since I will be working both jobs that day and won’t be seeing them other than at breakfast before bedtime really). These hold up great frozen in proportioned Ziploc baggies (where is my endorsement deal from them?) for about a month, so this recipe makes tons of pancakes. Enjoy the love-fest all month long!
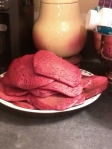
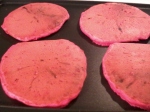
Red Velvet Pancakes

Red Velvet Pancakes

6 cups all-purpose flour

6 teaspoons baking powder

1 1/2 teaspoons baking soda

1 1/2 teaspoons salt

1 1/2 cups white sugar

1 cup unsweetened cocoa powder

6 eggs

4 1/2 cups buttermilk

1 1/2 cups 2% or whole milk, or almond milk, or half and half (no 1 % or skim)

6 tablespoons red food coloring

6 teaspoons vanilla extract

1 ¼ cups unsalted butter, melted

Mix all the dry ingredients in a really large bowl. Mix all the wet in a medium-sized bowl, whisk these

Because I love these old cards...

Because I love these old cards…

thoroughly, this is like when making a cake, once you combine wet and dry ingredients you are going to want to leave lumps so that these pancakes are nice and fluffy.Combine everything in the large bowl, slowly whisking until it’s well combined. (There should be no flour in the bottom of the bowl, but small lumps of flour in the mix are good)

Heat very flat frying pan, or griddle, to a medium high heat. (If your first batch of pancakes turns too dark or cooks super-fast, lower the heat. They should take a while to cook.)

Pour out batter onto griddle and leave them alone as the bubbles form. When the uncooked side is fairly covered in popped bubbles, flip. (The edges will also look dry)

After flipping, allow them to rise (DO NOT press them down! This will make them heavy instead of fluffy!). The reason you are cooking at the lowest possible temperature is so they can cook through without burning or squishing, all of which are bad for pancakes. The best time for this side is about ½ the time they spent on the other side cooking. Experiment with the timing until you get a feel for it.

*This is also fun if  you toss in chocolate chips instead of cocoa powder and  reduce sugar to 1/2 cup, and reduce red food coloring to about 3 Tablespoons. Then you have Pink Chocolate Chip Pancakes!*

Sizzling on a griddle...

Sizzling on a griddle…

You can use regular syrup (BoyChild II is a purest). I also (thoroughly) enjoy melted butter with a sprinkle of powdered sugar as my topping. (Of course, I like any pancake best this way, you know, dripping with buttery goodness…) But if this is all too pedestrian for you (or there is someone to impress) try the following glaze recipe poured hot over the top.Vintage VDay

Cream Cheese Glaze:

Remember Cream Cheese Frosting? Get 2 cups out of your fridge (What you haven’t been keeping some in there for mid night snacking straight from the Tupperware “just in case”?! Well, then whip some up real quick).

Put the 2 cups frosting in a microwave safe bowl, add 2 Tablespoons of water.

Heat on 50% power 30 seconds at a time, stirring every 30 seconds, until melted. If your mix is still too thick, add more water 1 Tablespoon at a time.

Space VDayServe glaze warm over hot, buttered pancakes.

Do you have a special Valentine’s Day meal? Please share in the comments or email me at mamaskitchentable@gmail.com.

eggcellent valentine

eggcellent valentine

Happy Valentine’s Day my loves!

Jazzing up Thanksgiving Leftovers

Who’s over their Thanksgiving leftovers? Tired of plates of Turkey, stuffing, greens and cranberry sauce? It’s cool, me too, and for the record there has never been a “part 6” of a series that wasn’t tired and at least a little disappointing. The following recipes are versions of Shepard’s Pie that are designed to use my Thanksgiving leftovers. I recommend not doing all of these, pick the leftovers you have the most of for this one and then do something completely different tomorrow night. Also? All of these can be frozen after assembled for about 3 to 4 months, so you can save these for February when you really like turkey again if you’d rather.

Option 1:

  1. Tear or dice cooked turkey (white or dark won’t matter) and place in bottom of medium-sized casserole dish.
  2. Add 1 can drained or 1 small bag frozen mixed veggies (soup mix or diced mix work best) to casserole dish.
  3. Top with enough turkey gravy to coat (about 1 to 2 cups, this is a preference thing) and stir.
  4. Create “top crust” with mashed potatoes. You want this layers to be between 1 1/2 and 3 inches deep, again depending on preference. Also, it’s a crust, do not stir.
  5. Sprinkle paprika and seasoned salt across the top.
  6. Bake in 350 degree oven until peaks of potatoes brown slightly, this will take about 20 minutes.
  7. Make sure dish is hot all the way through and serve!

Option 2:

  1. Repeat steps 1 through 3 from above.
  2. Top with “top crust” of stuffing (or dressing, whatever you call it). This layer should be about 2 to 3 inches thick. Do not stir.
  3. Sprinkle with paprika across the top.
  4. Bake in 350 degree oven until edges of stuffing become browned and crispy, about 20 minutes.
  5. Make sure dish is hot all the way through and serve!

Option 3:

  1. Repeat steps 1 through 3 from option 1.
  2. Crumble cornbread over top, creating a 2 inch minimum topping. (If you have no cornbread but want to try this: mix 1 box Jiffy Corn Muffin mix as directed on the box and pour over “filling”. Bake as directed on box)
  3. Add several (generous or about 2 Tbls) dollops of butter sporadically over the cornbread. Cover dish with lid.
  4. Bake in 350 degree oven until heated through and butter has melted, about 20 minutes.
  5. Serve and enjoy!

Option 4:

  1. Repeat step 1 from option 1.
  2. Add any leftover veggies (ex: corn off cob, green beans, broccoli, spinach); or few spoonfuls of green bean casserole (now mushy onions and all); or broccoli casserole. whatever you add, stir it all together.
  3. Add about 2 cups (again preference thing here) of shredded cheddar or colby cheese. (If you are using broccoli casserole you should probably go with just one cup).
  4. Top with mashed potatoes, twice-baked potato casserole, or cornbread. (Depending on what you are topping with follow the appropriate instructions above, or just coat top with potato casserole about 2 inches thick).
  5. Bake about 20 minutes in a (you guessed it) 350 degree oven.
  6. Make sure it is heated through and serve!

Option 5: (the veggie-less option for the picky ones in your group)

  1. This works best with leftover ham torn into bits, but turkey and chicken also work. Layer leftover meat in bottom of medium-sized casserole dish.
  2. Add one can (drained) in its own juice chuncked or tidbit pineapple. (if you have leftover crushed or that’s what’s in your pantry, that’s fine, just use about 1/2 of the can (also drained).
  3. Top with leftover sweet potato casserole or any leftover cooked sweet potatoes (including just plain mashed or sliced). Sprinkle crushed pecans on top (if you like).
  4. Heat in microwave until heated through, or oven if you prefer (but put the lid on in the oven).
  5. Serve and enjoy!

So five casseroles to choose from. These use up some leftovers pretty quick (especially if you make one to freeze for later). Obviously all of these are still going to have a fall comfort food feel, so I like to alternate a leftover casserole with something like spaghetti or tacos, just to break things up. I hope these ideas help you jazz up some of your leftovers!

Simply Turkey

Thanksgiving Spread 2011

Cooking a turkey can be very intimidating the first time. I know I was petrified. Then there’s the rumor going around that you have to get up at 5am to cook said turkey, which is just silly, unless you wanted Thanksgiving Breakfast I suppose. So this is the way I’ve discovered to cook a turkey in your oven that is easy, moist and delicious (also the meat seasoned this way work great for a million turkey leftover recipes). First you have to select your turkey. Remember how you figured your head count? Well, imagine about 1lb uncooked bird per person. This will leave you with plenty of leftovers, but not leftovers in December. I cook about a 12 1/2lb turkey even though our head count is 13 or so, mostly because we make way too many sides each year and this year we are also having ham (ironically this is a “guy thing”). The list below gives you cook times so you can better plan your day.

*Keep in mind that if it’s a frozen turkey you should start thawing it (on the bottom shelf of your fridge) Sunday afternoon or Monday morning. *

6-8lbs 2-2 ½ hrs

8-12lbs 2 ½-3 hrs

12-16lbs 3-3 ½ hrs

16-20lbs 3 ½-4 hrs

20-24lbs 4-4 ½ hrs

Turkey is done when it reaches a temperature of 165 degrees internally. They come with those little pop out thingies that will let you know when they are done, but I do like to double check with a meat thermometer, just in case. I cook our turkey at 350 degrees, but as the day goes on I occasionally turn the oven up to say 375 for rolls (which will only be about 10 to 15 minutes, and will not harm your turkey). I assume that’s why my turkey never takes the full amount of time to cook, but I only have the one oven. Also when plotting time for Thanksgiving Day, keep in mind after you cook your turkey it needs 20 to 30 minutes to “rest” (which is fancy chef’s language for let the juices get all good and soaked in) before you carve it. This is the perfect time to stick a few things back in that suddenly empty oven to heat them back up.

My rub for simply wonderful turkey:

Onion Powder

Paprika

Seasoned Salt

Dried Rosemary (crush it in your hand before mixing it with the other seasonings)

Pinch of Sage (compared to others)

Pinch of Black Pepper

The top 4 ingredients   should be in almost equal portions, sorry, I never measure and have no idea how much I put on a turkey. This should be rubbed on the breasts of the turkey under the skin and all over the exterior of the turkey.

I make my rosemary olive oil, but you can but it too and it’s not that expensive. I use that under the breast skin (about 2 Tbls) and then drizzled over the entire bird (about 7 or 8 Tbls). While I am lubing up and rubbing down the turkey (we get very close) I am preheating the oven, you want that turkey to go into the oven no cooler than 350 or you really will be doing this all damn day. While you are cooking and assembling other dishes do not forget your turkey’s most important ingredient! That’d be love and attention. Every time you open the oven door use either a turkey baster or a ladle (I mean big cooking ladle, not teeny gravy ladle) and scoop the juices from the pan back over the turkey. Think of you turkey like a well behaved 5-year-old, you can leave it be, but you should check on it at least every 30 minutes. If your oven door hasn’t opened in the last 30 thirty minutes, do so and ladle that baby up. I was looking for the tiny turkey cooking times and the giant turkey cooking times on the internet when I (happily, because I cook about the way she does and firmly believe butter gets a bad rap) discovered this is also how Paula Deen cooks her turkey! She uses a more sophisticated rub, (duh, real cook) but I’m referring to the turkey basting love, I thought that was kinda cool.

Don’t be scared of the turkey (they are not even intimidating before they get naked the way you buy them at the store), and wow the hell of anybody who gets the privilege to sit at your table this year. (Miscreants are eating out of their laps in the den around here, so really, privilege.)

Thanksgiving Planning in 7 Easy Steps

As many of you know I love I love a good party, any holiday I can get my hands on and run with. Well Thanksgiving is one of my favorites, mostly because it’s all about the food. Food, family, and just enjoying each other, can’t beat that with a stick. As much as I am excited about next week, I know that some are nervous, stressed, overwhelmed, which is totally taking away from your ability to enjoy the holiday. In an effort to help prevent any of you from “Gettin’ all Holiday”(defined below for those of you who were unaware) on anyone I made a list (yay, lists!) of things that help me stay sane/cheerful/fairly relaxed during the next week. Keep in mind, I firmly belive if you aren’t having fun, stop, do it differently, don’t do it at all, whatever, but holidays should be fun, for EVERYONE, not just the kids, not just the in-laws, not just your own family. Kay, back off of soap box & onto list of helpfulness…

  1. Make a Master list. I know, first item on the list is make a list, but this helps, I promise. Make a list of whose (probably) going to be there. (this gives you a head count & keeps fresh in your mind any dietary restrictions, which you should write next to people’s name on this list) On your Master list you have eaters and eaten. So you should list all the food you want to serve. (like you are brainstorming, you can cut items later).
  2. Edit that list! Go through the Master list and evaluate it. Are you serving 8 sweet potato dishes? Is someone going to be rushed to the hospital due to the fact that every dish has their allergen in it? Is the vegetarian in your group about to waste away? What about the no veggie/meat and PLAIN potatoes only eater? Do you have more deserts that side dishes? Balance your menu as best you can and rewrite it. This list goes on the fridge so you can find it all week long.
  3. Calender. Draw a 1 to 2 week calendar on a sheet of notebook paper. (I recommend 2 week for maximum holiday chill time, but as long as you have a week you should be fine) Plot 2 days to go grocery shopping (the second should be no earlier than the Monday before Thanksgiving and no later than the Wednesday before, DO NOT plan to go on Thanksgiving! Yes, you can go for an emergency, but don’t do that to you intentionally!) Using you edited menu, decide what you are going to cook and when. Keep in mind fridge space when you do this. Your goal is to cook as few things as humanly possible on Thanksgiving day. (think Turkey on the day, Sweet Potato Pie can be cooked 2 weeks early, boil eggs on Saturday to Devil on Thanksgiving Day, etc)
  4. Grocery Lists (yes 2 lists) and Shopping your Pantry. Sit down with your Edited list, Calendar, and all your recipes along with 2 sheets of paper. One list will be for that first trip to the store, you get the idea. It helps to have a child (or relative/friend/etc) look for items as you call them out from recipe cards. If you have the item on stock, pull it out (try putting all non perishables in a box), if you don’t it goes on one of your two lists. Place items on your list with an eye on when you plan to make what. However, I would buy the Turkey at least one week early, so you still get to pick. 2 lists have 3 main benefits, #1 it spreads out your grocery budget across (hopefully) more than one paycheck, #2 if you forgot/underestimated how much you needed/etc you have PLANNED to go back (this is emotionally important, I promise) making 1 “extra” trip is waaay more relaxing than 4 or 5 for other little things, #3 you can start cooking 1 1/2 to 2 weeks in advance and still have fresh veggies on the actual day.       *At this point I point out that if you aren’t already the owner of one of those magnetic clips? Invest. They look like the clip part of an old clipboard, but stick to the fridge. they are perfect for holding school flyers, and will keep all of your lists in order (ie not lost).*
  5. Follow your Plan. Except when your life happens, then adjust your plan. You will have more freedom to do this the earlier you start. See how much more relaxing that is?
  6. Enjoy Thanksgiving! You did all of this! You are the conductor of your very own gastronomical symphony! (Many pats on the back)
  7. Do not leave house on Black Friday. An important final stress reducing step. Out of milk? It’s all good, no one will die between now and Saturday, I promise. Make sure some Holiday Booze was secreted away for today, enjoy it, prop your feet and laugh at the people assaulting each other on the news while wearing your fuzzy pjs.

Hope you enjoy your Thanksgiving! recipes/etc to follow this week!

*Gettin’ all Holiday: Usually used as in “I was so mad about how that woman was acting, I was this close to Gettin’ all Holiday on her ass.” Comes from years in restaurants that were open on the holidays and located near malls, refers to the way people act (like complete shit heads)/treat each other (as though they are actually insane and self-species-loathing) from November 1st through January 10th or so every year. Is most famous for occurring on Black Friday, but can be seen in disrespectful, self-absorbed,and hatefully people any day during this time period. We have been using it for years (pre YouTube) along with “Y’all have a Rainbow F-ing Day” (which is a story for later) but last year it was demonstrated even better than I can explain by folks all over the good ole US of A. Try to avoid Gettin’ all Holiday on folks, you could end up on the internet…*